There is a saying that goes, “You don’t know what you’ve got until it’s gone,” and that’s true for the Markup tool. Despite occupying a very small space, the Markup tool often plays a huge role in our daily lives. While appearing as a small tool, there are many things you do with this tool. So let’s explore each feature and understand how to make the most of the Markup tool on iPhone and iPad.
What does the Markup tool do?
The Markup is a tool integrated into iOS and iPadOS that allows users to annotate and edit files directly without any third-party applications. With Markup, users can add text, shapes, and drawings and adjust the size and color of these elements.
System apps that use Markup tools:
- Photos
- Messages
- Files
- Photos
- Freeform
- Notes
- Books
Depending on the app or activity you are doing, the position of the Markup tool differs slightly here and there. Regardless, let’s take a look at everything you can do with this handy tool.
Tips to use Markup on iPhone and iPad like a pro
All of these features are available for the system apps that support Markup.

- Pen: You can use this tool to write or draw anything to the files. You can adjust the thickness as well as the opacity of the pen tool.
- Highlighter (marker): Gives the option to highlight a particular text or part of the file. Users can customize the size as well as the opacity.
- Pencil: The pencil tool also offers similar features to the pen and highlighter tools. You can customize the opacity as well as the size of the pencil nib.
- Eraser: Use this tool to erase things. To get the customize menu, tap and hold the eraser icon, and under Pixel Erase, you can adjust the size, and for Object Eraser, you can remove the entire object.
- Lasso: The tool is best for moving around things you have added to the file through other tools. Simply draw around the object and meet the ends. Then, you can tap and move the object to place them where you want.
- Ruler: Measure particular parts of the files and help align objects according to your needs.
- Color pallet: Helps to adjust the color of markup tools such as pen, marker, and pencil.
- Plus menu: This gives you access to additional features such as:
- Description: Add an alt text description to the image.
- Text: Add text to the image.
- Signature: Help the user to sign on a document or image.
- Magnifier: With this tool, you will be able to magnify a particular part of the picture.
- Apart from the tools mentioned above, you also get access to some shapes, which you can place where you need them to be. If you want to move or adjust these shapes, you must tap on the center and move them around. By dragging the points, you can adjust the shape’s size.
How to edit a screenshot using Markup on iPhone or iPad
Once you take a screenshot on your iPhone or iPad, tap the screenshot, and it will open with the Markup tool enabled. If not, tap the Markup icon on the top, and the tool will be enabled on your iPhone and iPad.
This might be an iOS feature that most users might know. But if you don’t, we have already prepared a detailed guide on how to use Markup tool to edit screenshots on iPhone.
How to share a Markup image
While editing a screenshot, you can share it directly instead of going through the process of saving them and then sharing it later. All you have to do is hit the Share button and move forward.
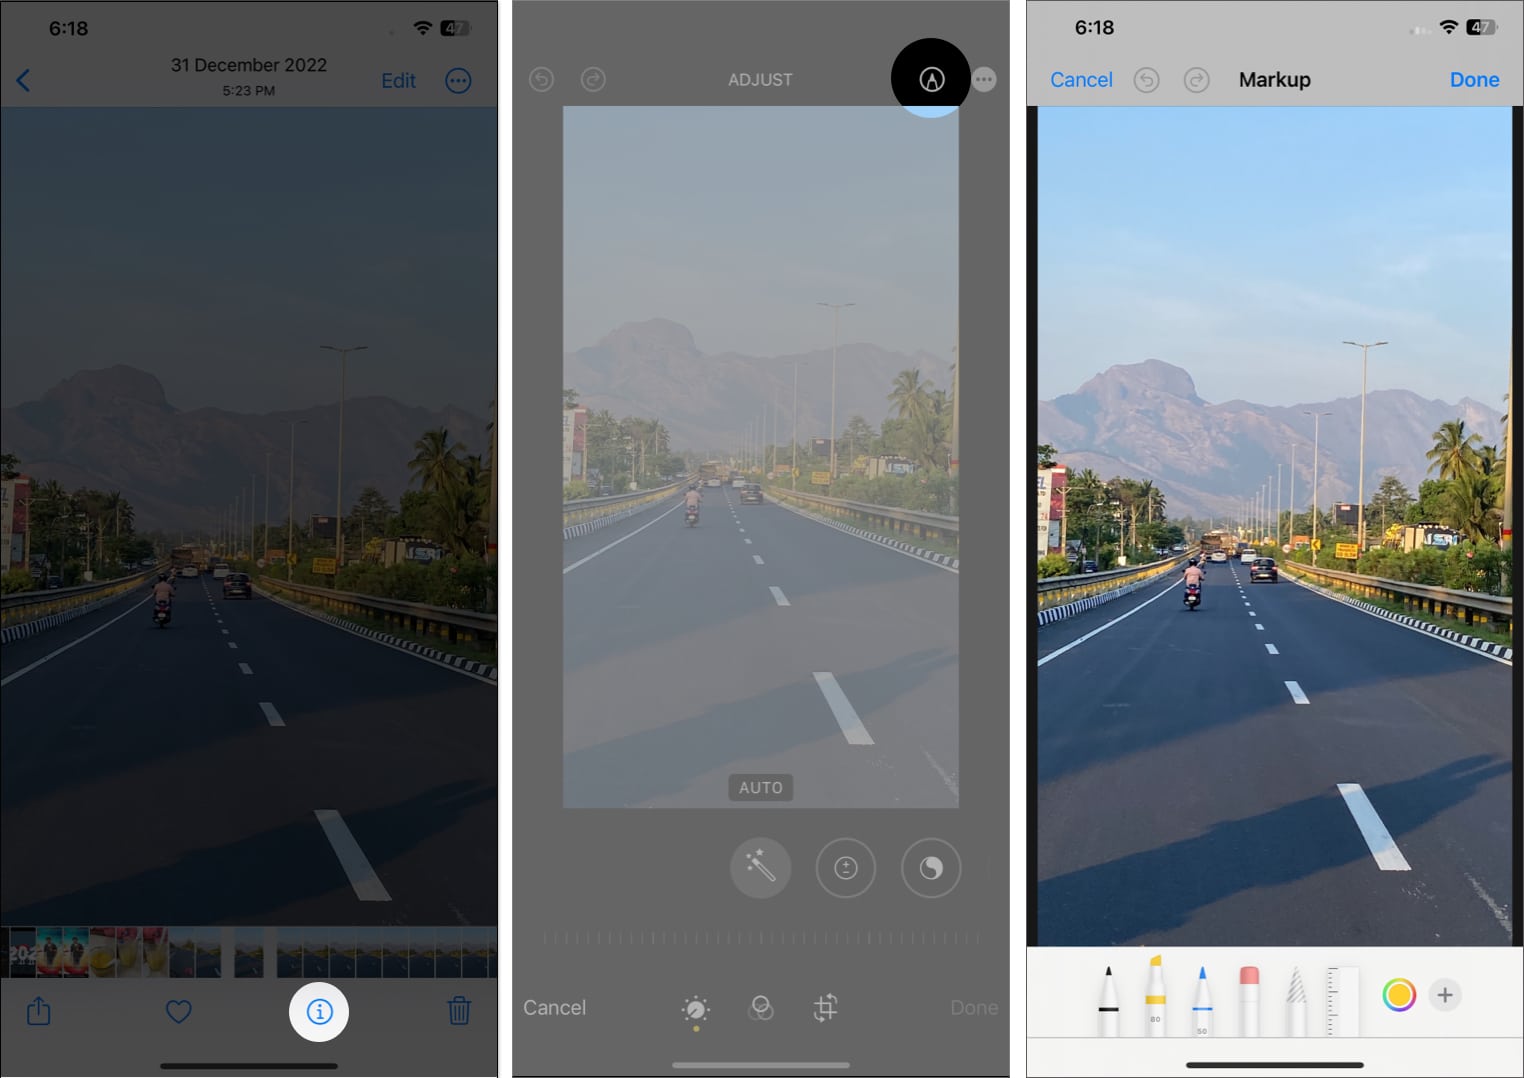
How to use Markup in Photos app on iPhone
- Open the photo of your choice.
- Tap Edit.
- Now, tap the Markup tool icon from the top left corner.
Then you can start making edits by tapping Add button to add text, shapes, and more. - Tap Done after making necessary changes.
Use Markup in Messages app on iPhone
- Open a conversation on the Messages app.
- Tap the Photos button.
- Select the image of your choice.
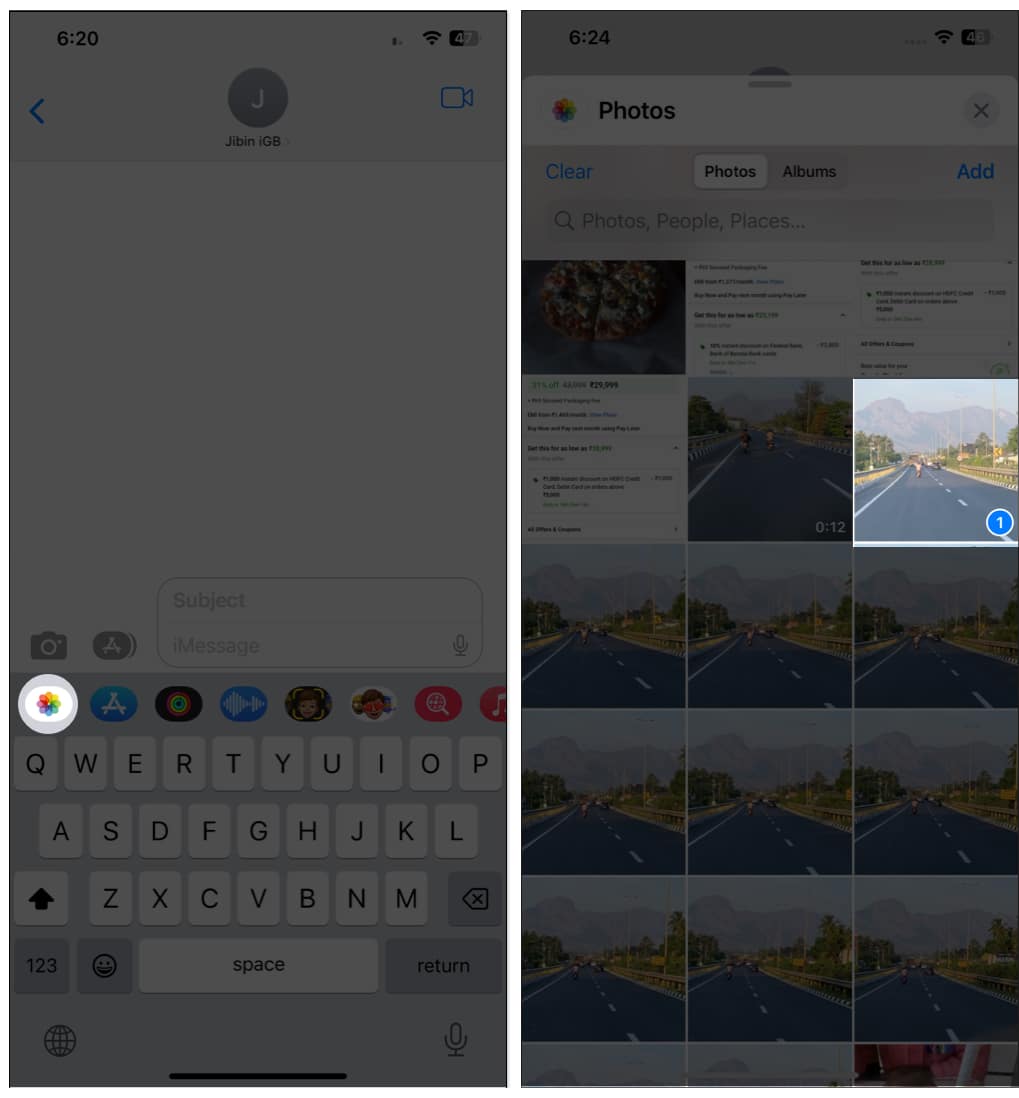
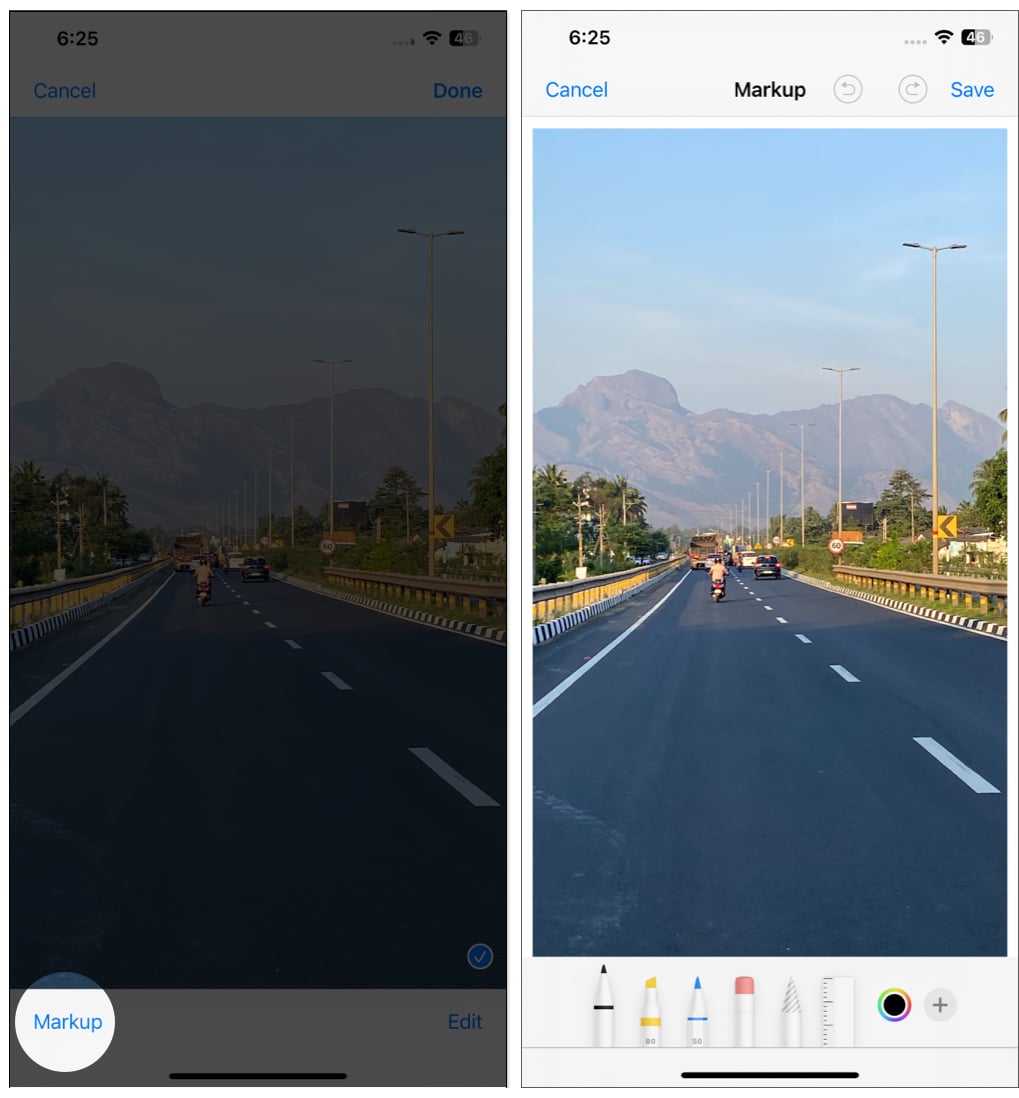
- Now, tap the image → select Markup from the bottom left.
- Make edits and tap Save once done.
Use Markup in Files app on iPhone
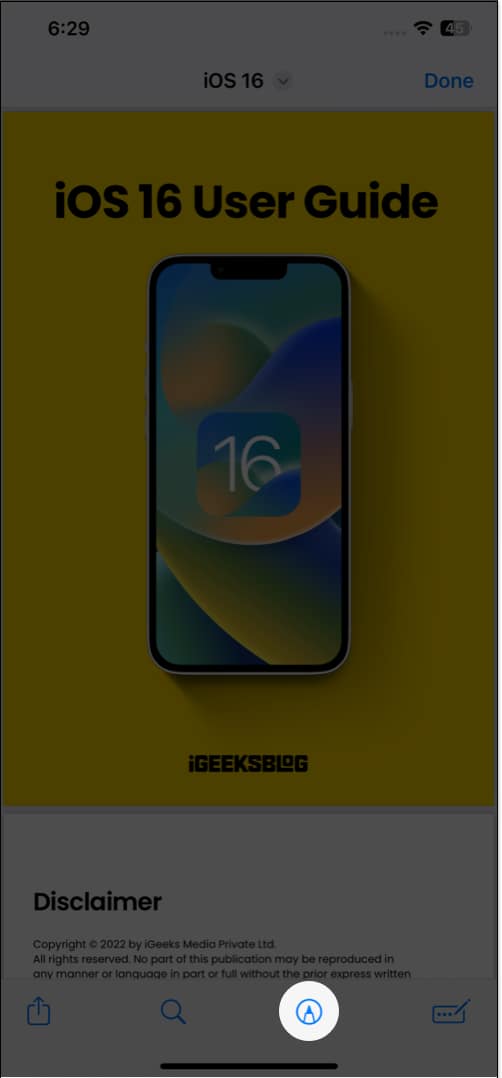
- Open any photo or file on the Files app.
Note: Markup doesn’t support certain file formats. - Tap the Markup icon at the bottom right.
- Select Done after making necessary edits.
How to use Markup in Mail app on iPhone
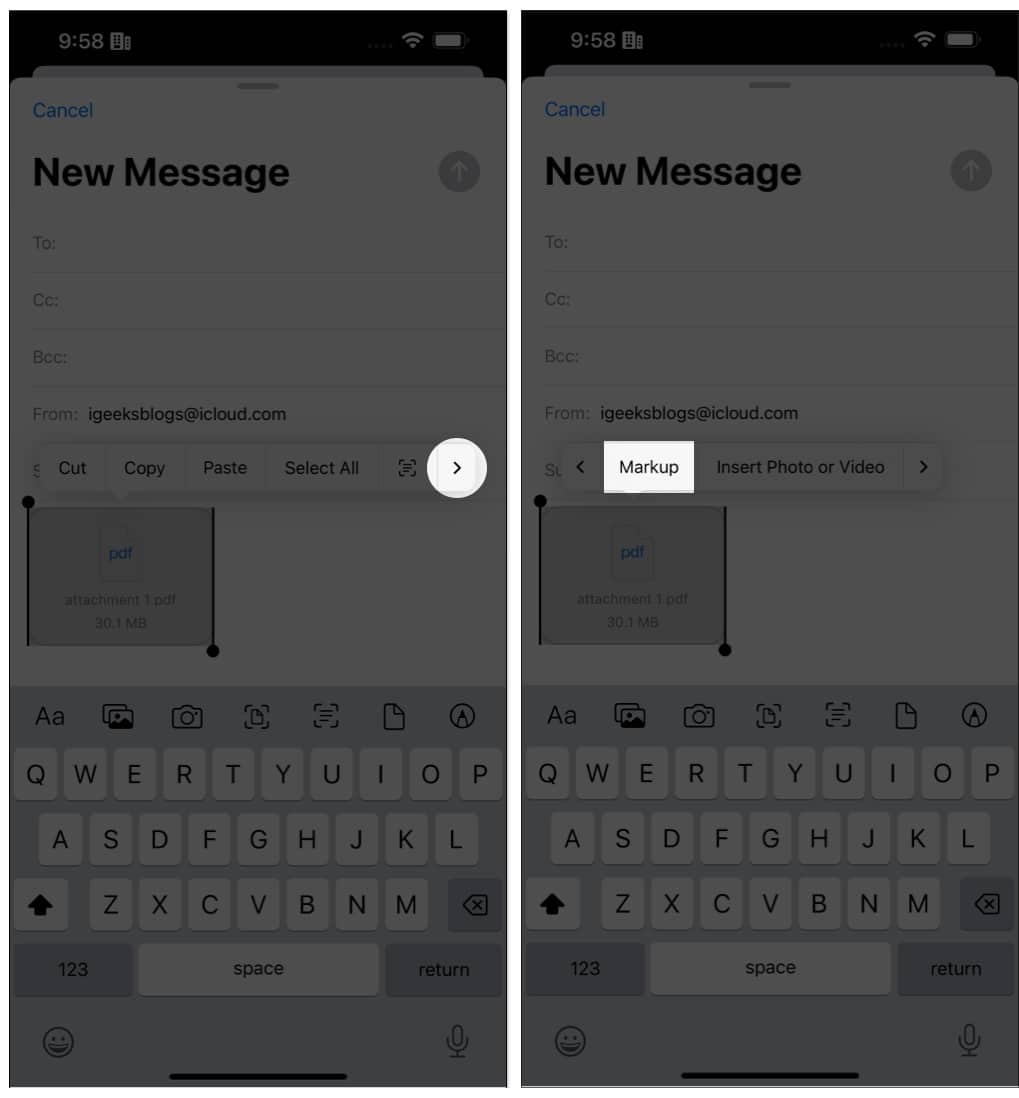
- Open the compose mail screen in the Mail app.
- Tap inside the body of your mail.
- Now, tap the < button on the top right corner of the Apple keyboard.
- Further, you can add attachments to the mail after making the required changes using Markup from the following system apps:
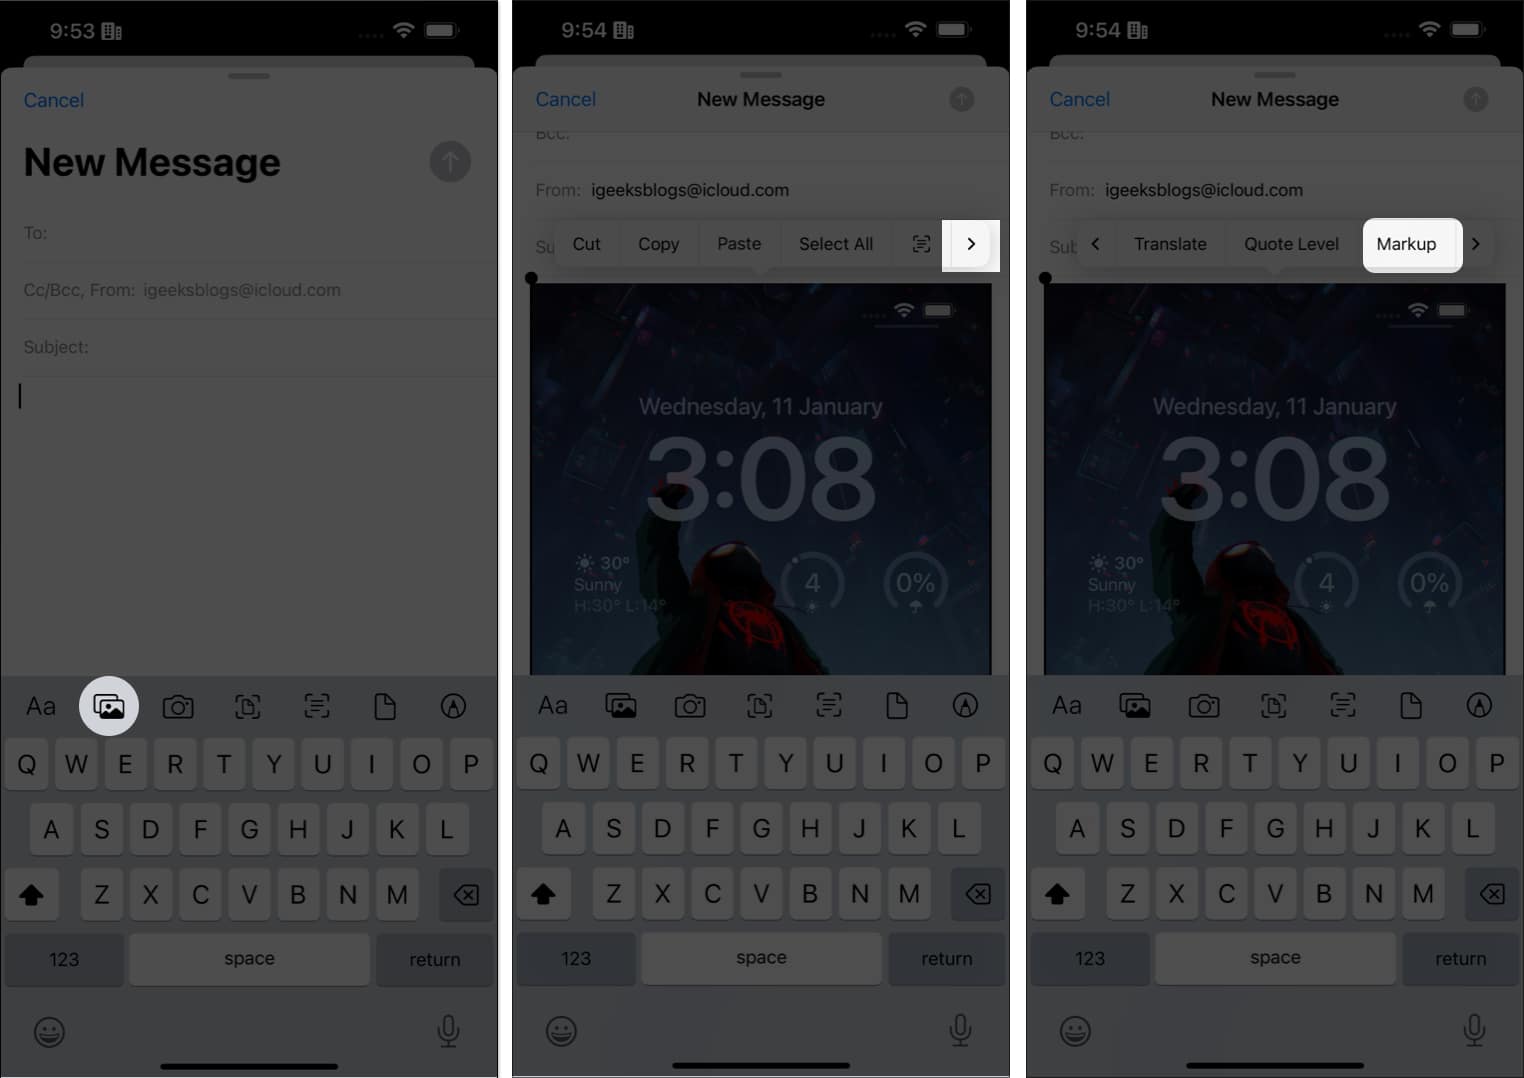
Photos
- Tap the Photos icon.
- Add any photo of your choice.
- Tap and hold the image.
- From the options that appear, choose >.
- Continue until you find Markup and tap Markup.
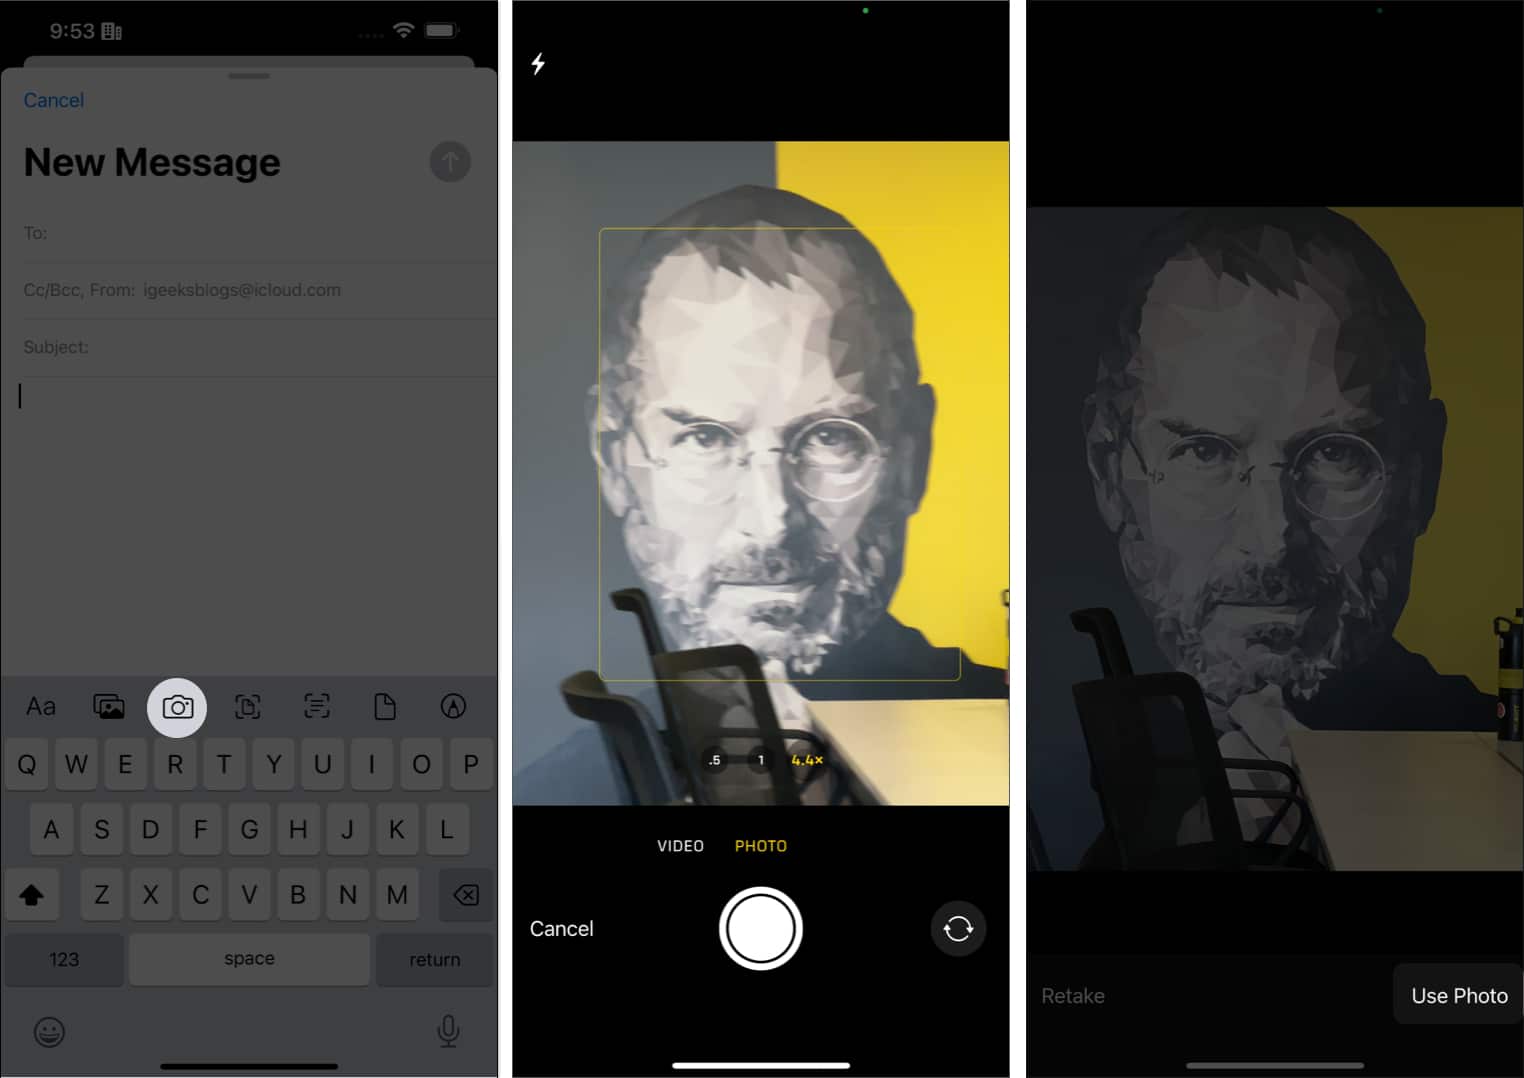
From Camera
- Tap the Camera icon and take a picture.
- Once you are okay with the picture, tap Use Photo.
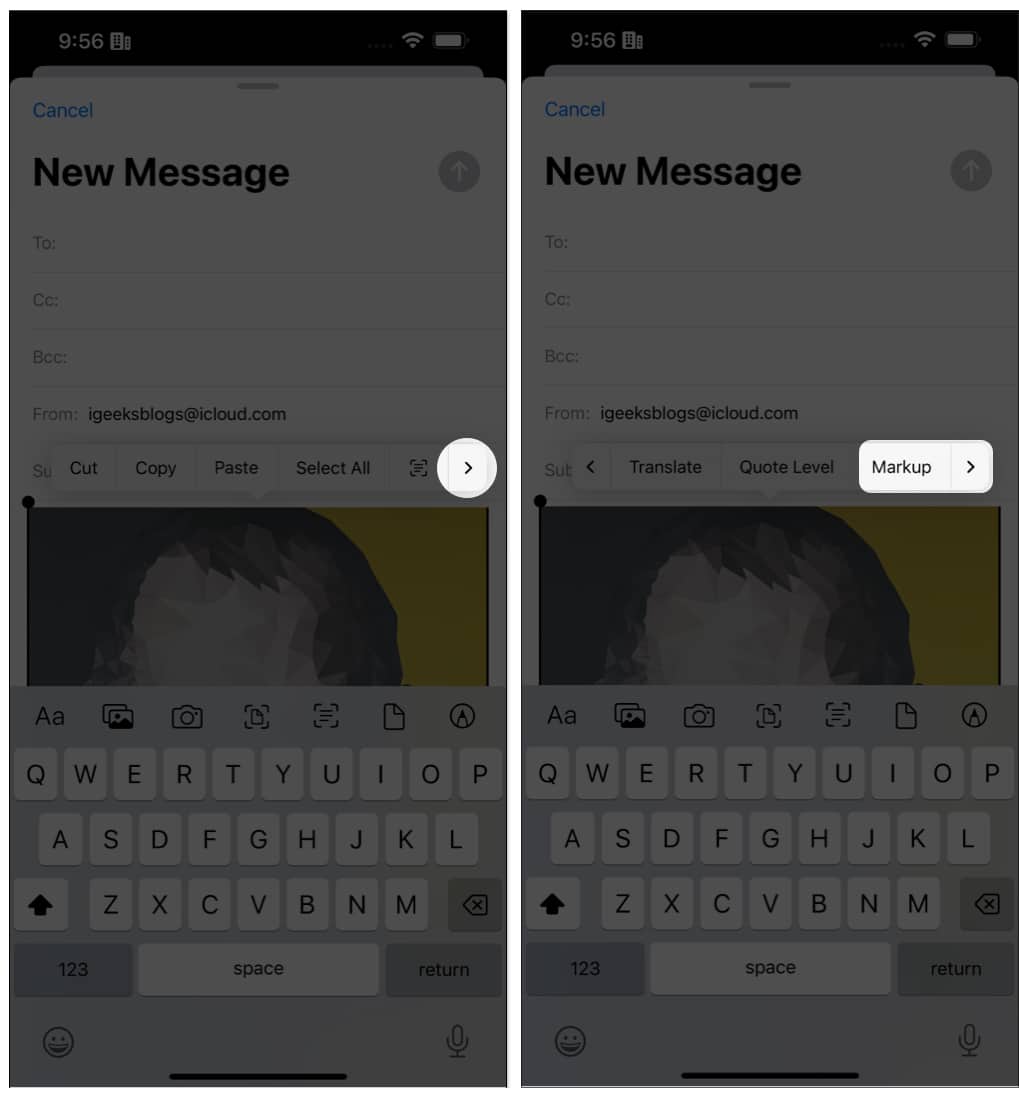
- Now, tap and hold the image and tap >.
- Choose Markup.
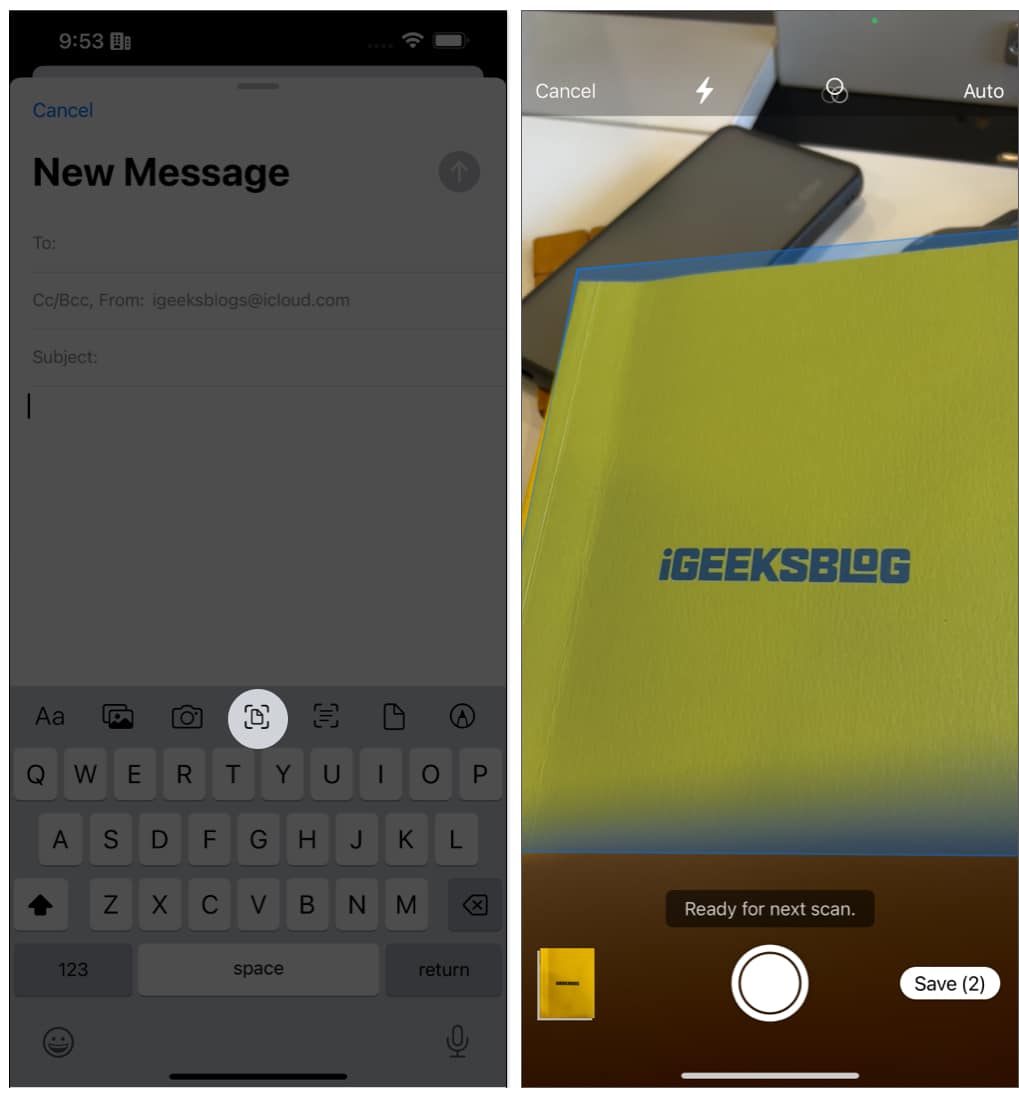
Scan Document
- Hit the Scan document icon.
- Start capturing the pages.
- Once done, hit Save.
- Next, double-tap the document file and hit >.
- Find and tap Markup.
Uploading files from the Files app
- Select the Files icon.
- Add the file of your choice.
- Double-tap the file and choose >.
- Browse and tap Markup.
If you can’t find it, then the file may not support Markup.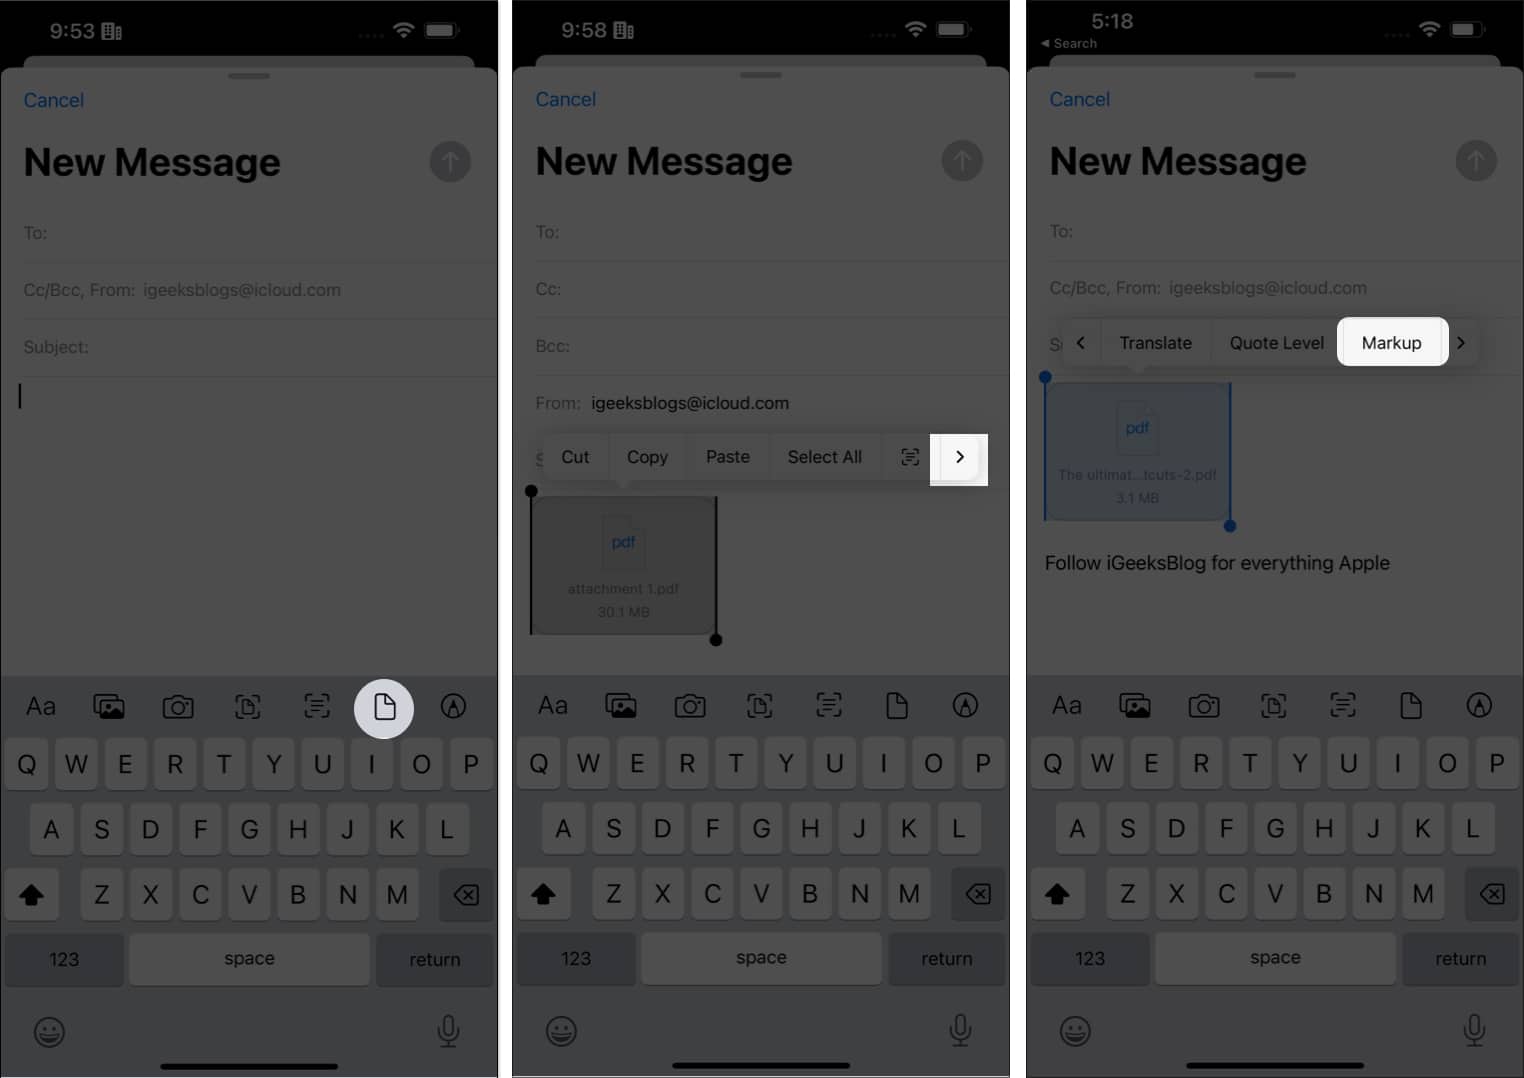
Drawing tool
While the name is different, the drawing tool offers the same tools you get with the Markup tool. So when we consider that, we can consider both tools to be the same. So to get this tool, all you have to do is hit the Markup tool icon.
Use Markup in the Notes app on iPhone
- Open any note on your iPhone.
- Tap the Markup tool icon from the bottom.
If you can’t find the icon, tap + and then choose the option.
Apart from this, you can also use Markup with the attachments added to Notes.
To do that:
- Hit the Camera button.
Can’t find it? Hit the + button at the top left corner above the keyboard.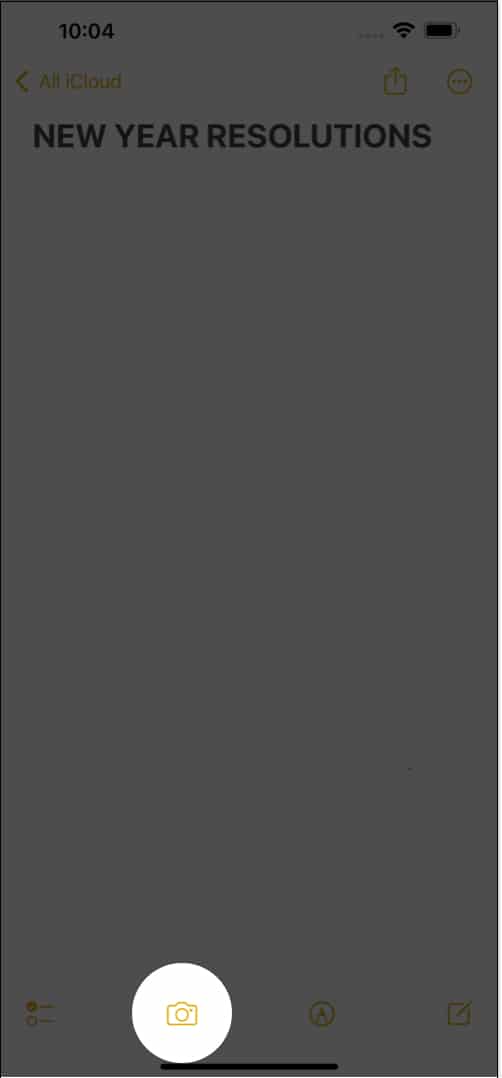
- Now, choose any option from the following:
- Choose Photos or Video: Select a photo → tap Add → hit the Markup icon.

- Take Photo or Video: Click an image → tap Use Photo → tap the image and select the Markup icon.

- Choose Photos or Video: Select a photo → tap Add → hit the Markup icon.
Use Markup to put signatures on PDFs, and documents on iPhone
Instead of using third-party PDF editors, you can easily use the Markup tool to make necessary changes to the documents. Here’s how:
- Open the PDF document.
Here, we are opening one in Books. - Tap the Markup tool on the top.
- Now, tap the plus button.
- From here, choose Signature.
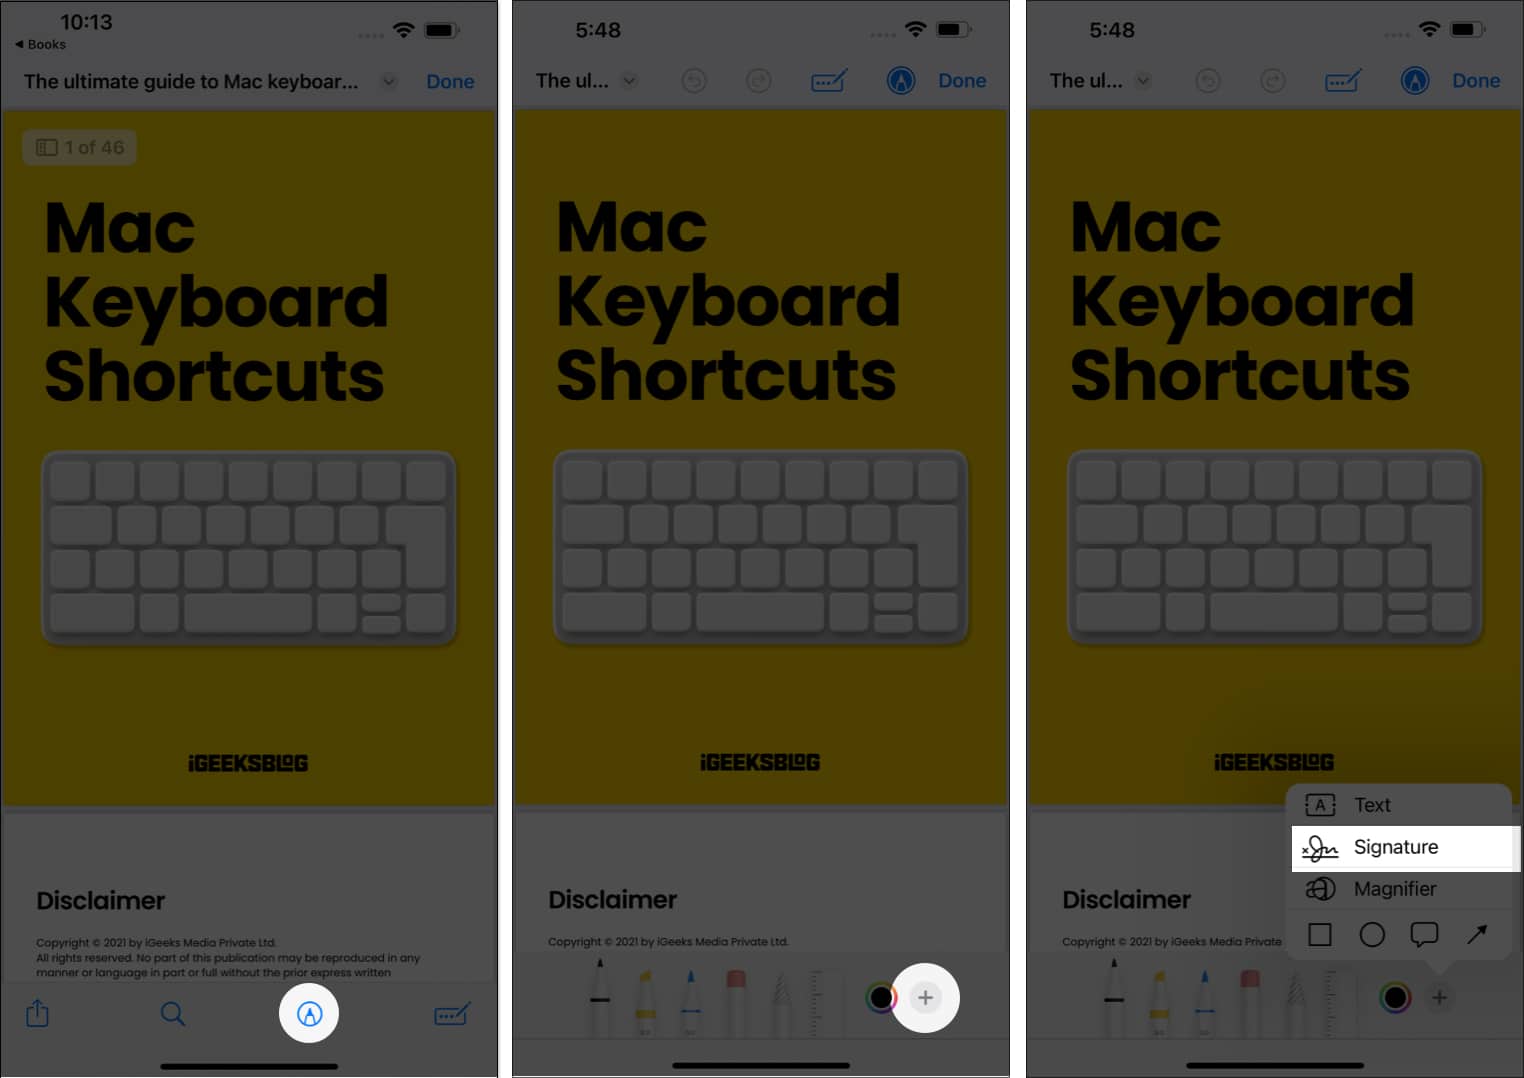
- Now, select the Signature and tap Done.
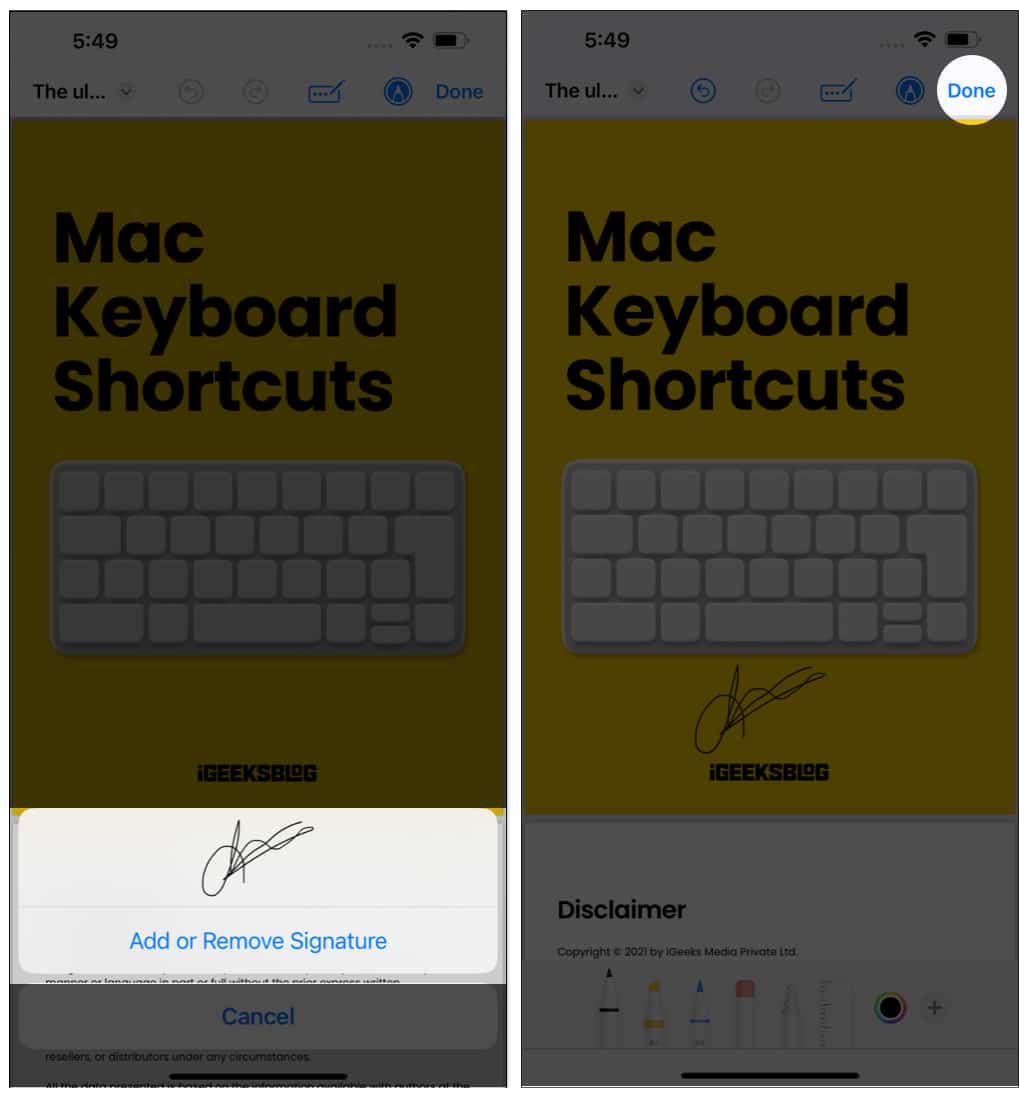
- Place the Signature where you want and tap anywhere on the screen.
To move or delete the added Signature from PDFs, simply tap and move it or hit the delete button. You can also use the Undo button to remove the Signature. If you want to add more Signatures or remove them, follow the same steps and tap Add or Remove Signature.
You can follow the same steps on supported apps such as Files, Books, and any other system or third-party apps. The only difference might be the position of the Markup button on some applications. It might be on the top for some and, for some, at the bottom.
FAQs
Try to change the opacity of the tools and check if you can access the Markup tool on other supported applications.
No. Currently, no official Apple Pencil supports iPhones and is only compatible with iPad. However, you can try a third-party stylus on your iPhone.
Usually, drawing on iPad with your hands is easy, but if you are having issues with screen smoothness, try to change. The screen protector of your iPad. Apart from that, if you are having issues while using Apple Pencil, try to change its tip and see if the issue is still there.
Showcase your ideas with the Markup tool!
With this detailed guide, I hope you will be able to use the Markup tool much better than before. It is an amazing tool to have on your iPhone and iPad. You can also use Markup on Freeform. Since the app is relatively new, we have done a detailed guide on how to use Freeform.
That’s all for today. If you have any doubts or queries regarding the Markup tool, do let me know in the comments.
More interesting tips and tricks for you!
- How to get Pixel Pals on iPhone 14 Pro and 14 Pro Max
- How to turn off camera sound on iPhone or iPad in 5 ways
- How to measure distance between two points in Google Maps on iPhone
🗣️ Our site is supported by our readers like you. When you purchase through our links, we earn a small commission. Read Disclaimer.

